If you’re embarking on renovations on a tight budget, it can be hard to decide what to do first. Experts identify these as the best projects for your wallet and your home.
Most people who purchase fixer-upper homes generally do so because they can’t afford a turnkey property that meets their needs. A recent report from Buildworld, a UK company that connects buyers with building materials, reveals that 73% of people who buy fixer-uppers do so because of money issues. However, financial reality can be challenging when moving into a home that needs a little (or a lot) of TLC. Homeowners often wonder which renovation projects they should focus on first if the budget is tight. And why?
According to Buildworld, the average spend on “necessary repairs” is about $13,000, and “practical upgrades” cost about $6,000. So we asked experts to help identify the fixer-upper projects that make the most sense right out of the gate and give you the most bang for your buck. Here’s what the industry insiders had to say, along with a few fixer-upper tips on how to get organized as you embark on your fixer-upper facelift.
You Bought a Fixer-Upper—Now What?
First things first: It’s essential to understand what work should be done for safety reasons and to prevent costly challenges down the road. The best way to do this is to have a professional assess your newly purchased home and use that insight to develop a game plan.
“Create a priority list and start with what must be fixed,” says Robbie Maynard, San Diego-based interior designer and owner of Robbie Interiors. “Hire an inspector to look for potential issues or hazards with electrical, plumbing, and the roof. It’s a good idea to start with the structure and take care of items like electrical, which can be a potential fire hazard, as well as plumbing issues so that you don’t end up with major problems or damage in the future. You will not see a great transformation, but it brings peace of mind.”
Getting a renovation cost estimate from an expert can give you a realistic idea of how much money you’ll need to accomplish each item on the list. Then you can decide what you can afford to do first. And remember, while safety repairs are likely among the most expensive, they’re critical to laying the proper groundwork for subsequent projects.
“Upgrading plumbing and electrical is always expensive,” says AmyLynn Schwartzbard, owner of New York City-based Life Designs Group. “A two-bedroom, two-bath home could run $25,000-plus for all new electrical wiring and outlets. Plumbing could run $15,000-plus. But the additional work isn’t worth doing if the inner runnings of the home are in disarray.”
1. Refresh Rooms with Paint
Once you’ve addressed safety matters, you can focus on aesthetic renovation projects and upgrades. Adding a new coat of paint throughout your home can make a big difference without a big investment, says Stephanie Lindsey, principal designer with Texas-based Etch Design Group.
“A fresh coat of paint on walls goes a long way for our mental health,” says Lindsey. “We feel rejuvenated and like we have a clean slate to start a new chapter. You can paint walls, cabinets, or even your front door for a fresh new look.”
The best part: a paint project can cost as little as $50, depending on the scope. Maynard also notes that paint almost always needs a refresh when a home transitions from one owner to the next. “New paint is the first thing that makes a huge impact,” says Maynard. “The great thing is you can paint yourself and save on this one.”
For an added style boost, consider painting an accent or focal wall, generally the wall you first see when entering a room. It might also be the wall where your sofa or bed is located. “Dark gray or smoky green or blue are all popular colors,” says Maynard.
2. Install New Flooring
Another project that can make a tremendous and immediate difference in a fixer-upper is flooring. Maynard recommends luxury vinyl plank flooring to save money, which runs about $5 a square foot.
“It’s the best thing since sliced bread,” says Maynard. “It looks like real wood for a fraction of the cost. I love the chevron or herringbone patterns, which I have been specifying in many of my projects. Luxury vinyl plank is also water-resistant and can be used in bathrooms. New flooring and paint will transform your fixer-upper right before your eyes.”
Not only will new flooring brighten a fixer-upper visually, but tackling this type of change early on can be much easier logistically. Once you’ve moved in, and your furniture and personal belongings fill every room, redoing flooring can be challenging at best.
“It can be downright unbearable while the work is being done,” says Ron Leffler of Virginia-based Ron Leffler Real Estate. “It usually takes several days from beginning to end. The smell from the fresh polyurethane [if you’re refinishing hardwood floors] can also take a day or two to dissipate.”
One additional fixer-upper tip: the color you select for your vinyl flooring or floor stain will also help set the stage for future updates in your home.
3. Upgrade the Exterior
Exterior upgrades are also an important consideration for fixer-uppers. They can be more affordable than interior changes, which often require plumbing and other system improvements. The 2020 US Houzz & Home Study found that 21% of renovating homeowners tackled roofing, windows and skylights, and exterior paint projects at a median spend of $8,000, $3,900, and $1,000, respectively. Realtor Jennifer Thomson says that outdoor yard and landscaping projects are also a good idea.
“Don’t forget about your fixer-upper’s curb appeal; the neighbors will thank you and you will be able to enjoy your yard in the summer months,” says Thomson, who recommends adding grass for starters. “If you use fast-growing grass seed, you will have a lush lawn surrounding your home in no time. Most homeowners spend between $450 and $900 on lawn seeding a 5,000-square-foot lawn. When it comes time to sell your fixer-upper, the curb appeal will add thousands to the value of your home.”
Bermuda grass germinates in as little as seven to 10 days, while Buffalo grass can take two weeks to 30 days, says Thomson. Yet another option is Centipede grass, which has a germination time of 14 to 21 days.
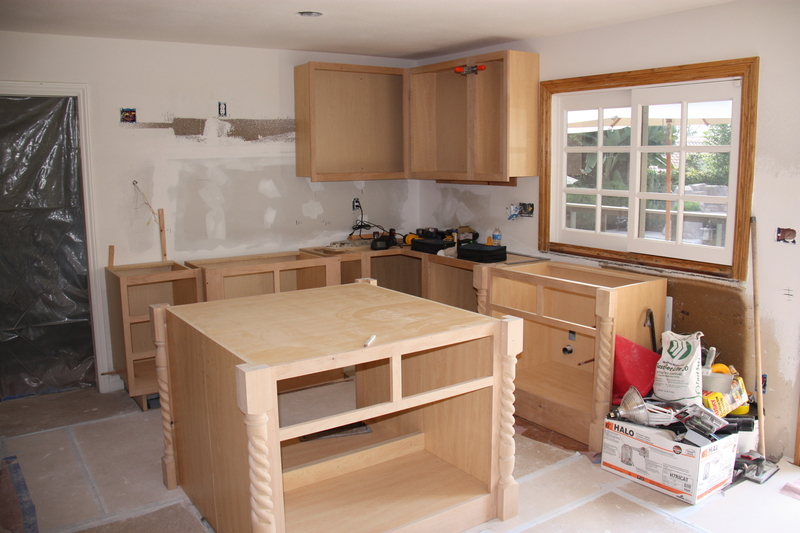
4. Remodel Your Kitchen
It’s no secret that kitchens are among the priciest renovations homeowners embark upon—because who doesn’t want a dream kitchen with all of the bells and whistles, right? The good news is that a kitchen renovation doesn’t have to cost a small fortune. And furthermore, you might want to prioritize your spending on this space, given just how big of a role kitchens play in everyday life. (Not to mention the solid return on investment you’re likely to get.)
“The kitchen is one of the most used and important spaces in the home,” says Maynard. She notes that one way to save costs on improvements in this room is by simply painting or refinishing your cabinets if they’re in good shape. Taking this approach could cost anywhere from $2,500 to $3,500, Maynard estimates.
If the doors aren’t in good shape and won’t be much improved with paint, refacing (replacing the doors) can be another budget-friendly cabinet upgrade option. Costs range from $5,000 to $7,000, says Maynard. Bottom line: kitchen renovations don’t have to cost more than $15,000 or $20,000.
“Everyone thinks a kitchen remodel is super expensive, but it doesn’t have to be. The Home Depot cabinets can look great. There are discount granite shops that will cut and install your countertop for much less than the high-end showroom places. I flip houses in California and can get an entire kitchen remodel for under $12,000,” says Nancy Chillag of 23rd Street Investors.
Chillag’s tricks of the trade include sourcing granite at warehouses, not showrooms, where you can purchase more affordable materials for a countertop upgrade. She also suggests searching for kitchen fixtures and other items at Lowe’s or similar big-box, high-volume stores instead of high-end showrooms.
5. Replace Windows
Installing new windows might not be the cheapest project to tackle initially, depending on who you buy them from (and you should definitely shop around.) But this improvement can pay for itself over the long run by saving you money on utility bills.
“Old windows might have air leaks, which can cause your furnace or HVAC system to work overtime and increase your bills,” says Andrew Wilson, a home improvement contractor based in Madison, Wisconsin. “Plus, it also makes living in the home comfier when you don’t have to worry about the cold breeze or warm summer heat entering through the windows seasonally.”
6. Repair Drywall and Ceilings
Yet another fixer-upper tip is to do significant drywall or ceiling repairs for logistical reasons, including moving walls. Like flooring, this type of work is best tackled before moving in.
“Removing popcorn ceiling texture? It’s a messy job and much easier to do when you don’t have to worry about getting furniture or floors wet and dirty,” says Robert Taylor, a rehabber based in Sacramento, California. He’s been fixing and flipping homes for more than 15 years.
Most homeowners can remove the popcorn ceiling on their own. Still, you’ll need someone to come through to retape and texture the ceiling, says Taylor, owner of The Real Estate Solutions Guy. Expect removal of acoustic ceiling texture and retexturing to cost around $2 to $3 per square foot, says Taylor.
How to Get the Most for Your Money
Whether you start with new flooring, kitchen renovations, updated ceilings, or drywall, when hiring a professional to do the work, shop around to ensure you’re getting a reasonable price. This will also help you develop a more complete picture of the expenses involved.
“Get at least three qualified quotes from contractors to do the work,” says John Bodrozic, co-founder of HomeZada, a platform that helps homeowners manage renovations. “This is where you start to see what the total cost of the project is beyond material costs because the contractor quotes will include their labor costs, their tools costs, insurance costs, and their goals for profit on the project.”
Another point about selecting a contractor: the lowest bid is not always the best, even when you’re on a tight budget.
“Hire the right contractor, don’t hire the cheapest contractor to save money,” says Chillag. “It will cost you more money in the long run. Get recommendations for contractors, interview them, and talk to their prior clients. A good contractor will look at your remodel wish list and give you advice on how to save money and what order to do things in so that you’re not undoing work later on in the remodel process.”
Final Considerations
Buying a fixer-upper can be a wise way to get into homeownership on a budget. It can also be a tremendous job and a labor of love, particularly if you intend to stay in the home long term rather than simply flip it in a few years. No matter which camp you’re in, make sure you thoroughly understand the work that needs to be done and why before diving into any projects. Mistakes can be costly, and if your budget is already tight, it’s best to spend your money judiciously as a new homeowner. Doing this requires being educated about your choices.
“One of the biggest tips anyone should know about renovating a fixer-upper is ensure the correct thing is being fixed. A common mistake is people thinking, for instance, that if floors aren’t leveled correctly, they need to replace the flooring. That’s a costly mistake since most of the time it’s not a flooring issue, but instead a problem with the home foundation,” says Wilson, the home improvement contractor. “It’s essential to be sure that what’s actually causing the issue is what’s being fixed.”
Mia Taylor, Better Homes & Gardens