An exterior entrance directly into your basement can simplify every-thing from moving in an extra fridge to upgrading the HVAC system. It’s also required if you finish the basement—enhancing the value and functionality of your home—though it doesn’t have to be a full-size outdoor entryway, or even an exterior door at all. A classic bulkhead—a.k.a. cellar doors—can do the trick, as can a large window leading to a shaft designed for escape in an emergency, an exit commonly known as egress. Just a few years ago, national building code called for a second means of egress (in addition to the access stairs) only for basement bedrooms, but any type of finished below-grade living space now requires it—and each bedroom also needs its own. “The egress must be large enough to not only accommodate people getting out in an emergency, but also firefighters entering in full gear with air tanks on their backs,” says TOH general contractor Tom Silva.
Do you need a specialist?
Although there are many companies that specialize in basement renovations, most licensed general contractors can add egress and pull the necessary permits (and finish your basement, for that matter). Whomever you hire may need to bring in an engineer to design any structural work required due to creating an opening in the basement wall, a landscape contractor to excavate the yard, and a masonry contractor to cut the foundation and, possibly, add concrete stairs.
Here are the four design possibilities, each with advantages and disadvantages.
Best for Basements Partially Above Grade:
Egress windows
The simplest solution, if the grade is low enough outside, is an egress window that’s large enough and low enough to make climbing out easy.
PROS: An egress window lets in light, and if you’re replacing a basement utility window, typically 30 to 36 inches wide, you likely don’t need to install a new header over the opening and can simply expand the opening vertically.
CONS: Unless the entire window will be above grade, you also need to add a window well, which requires digging, drainage, and a bigger budget.
WHAT’S INVOLVED: To install an egress window, a rough opening is cut in the foundation or wall using a concrete saw from both the interior and exterior, or a water-cooled chainsaw, which can make the full through cut from the outside, decreasing dust in the basement. The concrete’s edges may need patching; then a window buck—a pressure-treated frame, typically 2×6s, that the window will be fastened to—gets screwed or nailed in place. A double buck made with a second layer of 2× material allows for better anchoring and flashing of the window, says Marvin’s Jason Hensler, who is also president-elect of the National Association of the Remodeling Industry. The window is installed, flashed according to manufacturer instructions, and trimmed.
CODE REQUIREMENTS: An open egress window must offer an escape area of at least 5.7 square feet; it needs to be a minimum of 20 inches wide (which would make it 42 inches tall) or a minimum of 24 inches tall (which would have to be 35 inches wide), to achieve an opening of 5.7 square feet. For egress, the window sill can’t be more than 44 inches above the finished floor. And the window must be easy to unlock and open from the inside, no tools required.
GOOD TO KNOW: “Only the clearance with the window open counts toward code, so double-hung and sliding windows need to be about twice as large as other options,” says TOH builder Charlie Silva. In general, your best bet is an egress casement that opens a full 90 degrees; a tilt-and-turn window, which tilts in at the top for airflow or opens like a casement; or a specialty in-swing egress window. All consist of a single pane that opens fully. Composite or fiberglass windows are preferable to wood since the masonry foundation, being porous, can keep the window frame damp.
COST: $2,500 to $7,000 installed, depending on the type of foundation or wall, and window.
KNOW THE NUMBERS
To meet code and provide adequate room to move through, an egress window has to meet minimums for height, width, and overall size of the window opening, while staying within a maximum distance from the finished floor.

Best for Egress Windows Below Grade:
Window wells
Most basement windows that are 44 inches off the floor to provide safe egress will sit below grade outside, and that requires a window well—that is, a walled excavation below the level of the soil that provides exterior access to the window.
PROS: Wells make egress windows feasible in almost any basement, bring natural light into the new living space, and can even provide a spot for plantings to improve the view.
CONS: Adding window wells ratchets up the complexity—and price—of the project.
WHAT’S INVOLVED: In addition to installing the egress window, your contractor will need to excavate an opening for the well, and in some cases include a drainpipe down to the footing drain, a deep gravel pit below the well, or even a dedicated dry well. Your contractor should call 811 to have any utilities located prior to digging. The window well gets bolted to the foundation, caulked, and backfilled with gravel and soil. Digging next to the foundation is safe if the footing is intact. Digging below the footing requires special care and knowledge from a landscape contractor.
CODE REQUIREMENTS: The well must provide at least 9 square feet of clear area for escape, and its outside wall must be at least 36 inches away from the foundation. If the well is deeper than 44 inches, it must have built-in steps that measure at least 5 inches front to back or a built-in ladder with rungs 3 inches front to back; in either case, they must also be at least 12 inches wide with the vertical distance between them no more than 18 inches. Many localities require a cover—and it’s generally a good idea to keep out leaves, debris, stray animals, and water. The cover should be clear to allow in light and, ideally, be able to support an adult’s weight but still be light enough and easy enough for a child or an elderly person to open from inside without a key or tools.
GOOD TO KNOW: Make sure the window can open fully without hitting the walls of the window well or the cover. “We like to use kits that include everything from the window to the well to the clear polycarbonate cover,” says Ridgewood, NJ, contractor Rob Wennersten. “That way everything is sure to fit perfectly together, and you get a secure, watertight well.”
COST: $3,500 to $10,000 for a window and well installed, depending on the type of foundation, window, well, and drainage required.

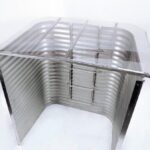
Buying a kit simplifies the process
Buying prefabricated window-well parts, including a cover, all together from a single manufacturer ensures the pieces will be compatible and meet basic code requirements. In most cases, the same company can sell you the egress window, too. SHOWN: Steel window well, ladder, and polycarbonate cover; brightideasegress.com
 CUSTOMIZE THE DESIGN
Creating your own window well with space for plantings offers you the opportunity to choose its size and look, using materials such as cedar timbers or precast concrete blocks that have the look of stone.
In general, to satisfy code, the landing area needs to be no smaller than 3 by 3 square feet, and it can’t interfere with the opening of the egress window. Building code also calls for a fixed ladder if the window-well walls are more than 44 inches high. Building tiered steps, as shown above, eliminates the need for a ladder and also reduces the risk of someone falling in; the deeper the step tread, the better. Here, with the area excavated and filled with gravel, three-sided boxes of stock 4×6s are attached to the house in a stepped-back fashion and backfilled with soil. As an added safety measure, installing rows of low shrubs along the sides—or railings if your window well is near a walkway—and a raised curb can help signal passersby to steer clear.
Always check with your local building department before planning an egress project. Municipal codes and required safety measures can vary widely.
—CHARLIE SILVA, TOH home builder
 Drainage is key
In most cases, adding basement egress requires digging a pit along the foundation, where water could collect and find its way inside. With small window wells and bulkhead doors, the opening is usually covered, but there’s always a chance something gets left open—or a time when driving rain gets inside anyway—so you’ll need to plan for drainage. That usually means a few feet of gravel with a drainpipe that’s tied into the foundation drain, an existing basement drainage system, or a new dry well. Any of these are possible solutions for all egress situations (see the illustration below for one example). “It really depends on your climate, the grade of your landscape, the direction of your roof pitch, and whether a gutter is discharging nearby,” says TOH home builder Charlie Silva. Your contractor will factor in all the variables of your installation and decide which drainage method is best for your project.
 Best for Storage and Utility Access:
Bulkhead doors
A good option for frequent use, this type of egress should include concrete stairs topped by a pair of doors sloped to allow rain to run off. There may also be an entry door in the foundation opening.
PROS: Full-size stairs allow for easy entrance and exit, especially good for moving items into and out of the basement—and for aging family members.
CONS: Most bulkhead doors don’t let in natural light, and they require about 30 square feet of yard space. On a small property, adding this type of entrance may infringe on property-line setbacks and require applying for a variance. Without proper maintenance, bulkhead doors are susceptible to leaking over time. Caulking should be inspected annually and redone periodically, as well as sealing any cracks that develop in the bulkhead’s concrete foundation.
WHAT’S INVOLVED: Once the wedge-shaped area is excavated, a masonry contractor will use a concrete saw to create an opening in the foundation wall. A header or lintel may be needed above the opening, which gets framed with single or double bucks. Siding may need to be removed where the bulkhead attaches to the house; the top of the bulkhead frame is bolted to the house framing, then flashed, before the siding can be reinstalled. Concrete stairs can be created on-site with forms, but more typically, the contractor will simply install a precast kit that includes the stairs, the landing at the bottom, and the walls. The walls of the precast unit get bolted to the foundation and caulked inside and out. The bulkhead door unit gets bolted to the top of its foundation and caulked inside and out.
CODE REQUIREMENTS: Though you may latch and lock bulkhead doors from inside, there must be no keys or tools required to do so—and they must be at least as wide as any door at the bottom of the stairs.
GOOD TO KNOW: Bulkhead doors were board-and-batten-style wood until the steel door Bilco introduced in 1926 became the standard. The company now makes maintenance-free polyethylene doors with a wood look; others offer translucent poly-carbonate doors that let in some light. Installation has gotten easier, too: There are companies that will come out, dig a triangular hole, and crane in precast stairs with the bulkhead doors already attached.
COST: $7,000 to $15,000 installed, on average.
MAKE THEM WEATHERTIGHT
The bulkhead doors come with a header, two foundation plates and sidepieces, and a sill. An extension can be used to cover a longer area, as shown above. The header is bolted to the house framing and attached directly to its concrete foundation. Caulking wherever the bulkhead meets the foundation and the house, as well as along the bulkhead’s mechanically fastened seams, both inside and out, will keep water from intruding.
 Best for a separate apartment
Full-height entrance with stairs
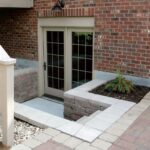
If the basement is going to become a rental unit, an in-law apartment, an accessory dwelling unit, or an office with visiting clients, it will need a full exterior entrance—and unless your yard is sloped enough for a walk-out doorway, you’ll also need stairs leading down to an exterior door in the foundation wall.
PROS: A proper entrance below grade provides easy access for people and for moving furniture and other large items in or out—and invites in natural light if you include a window panel in the door. It can also have a separate mailing address.
CONS: A full-height entrance requires 30 square feet or more of available yard space, and really should be located along the front or side, not the rear, of the house, for convenience.
WHAT’S INVOLVED: As with bulkhead doors, the project requires excavating the yard and cutting a hole in the foundation—in this case, for installing the exterior-grade door. You will also likely need to add a lintel to support the weight of the house over the door opening. The opening then gets single or double bucks, and the door gets installed against that. Too large to be precast, the stairs are typically poured-in-place concrete and finished with decking, tiles, pavers, or stone. This type of egress will likely require a connection to a footing drain or its own dry well.
CODE REQUIREMENTS: The entry door needs to be 36 inches wide and 80 inches tall. The stairs must be at least 36 inches wide, with treads that are 11 inches deep and risers that are no more than 73⁄4 inches high. If there are four or more stair risers, there must be guardrails along the sides of the opening at the top, and at least one handrail along the side. The finished floor at the base of the stairs must be 6 inches below the level of the basement floor, in case of flooding.
GOOD TO KNOW: Again, if the work comes close to the property line, you may need to apply for a zoning variance. In cold climates, you may need to install footings under the walls to prevent frost heaving. Covering the entryway with a roof or an awing will reduce potential problems with water intrusion—and the risk associated with icy steps.
COST: $20,000 to $30,000 installed, on average.
COMFORTABLE AND CONVENIENT
To ensure an entry with four or more steps is safe requires a guardrail along both sides as well as at least one handrail. The steps should follow the usual code for exterior entrances. Expect to plan for drainage with this type of egress, by either tying into an existing basement or foundation system, or a new dry well.
This Old House – Spring 2024 – February/March/April 2024

